Expert-Led Birding Trails: Discover Local Wildlife Like Never Before
Contents
You pull up to a well-known wildlife refuge, walk the main loop, and see a handful of common species. Meanwhile, a local birder a quarter mile away is ticking off three lifers. The difference isn’t luck — it’s knowledge of the trail system and how to use it. That’s what expert-led birding trails give you: a route shaped by someone who knows where the birds actually are, not just where the map says they should be.
This article walks you through how to find and follow expert-led birding trails, what makes them different from standard boardwalk loops, and how to get the most out of each outing. You’ll learn specific timing windows, habitat cues, and gear choices that separate a good day from a great one. By the end, you’ll have a practical system for scouting any trail like a local pro.
occer
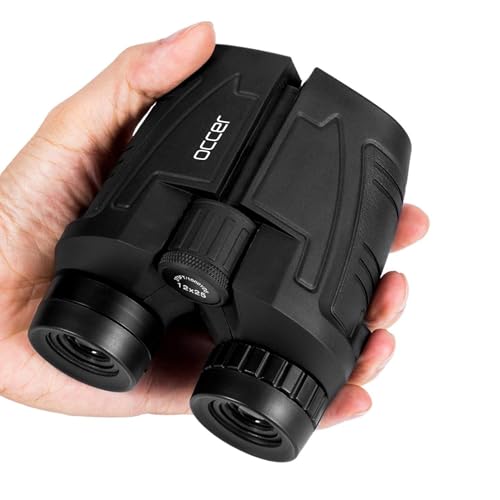
Occer 12x25 Compact Binoculars for Adults and…
- 【HIGH-POWERED LARGE EYEPIECE BINOCULARS】 This binoculars for adults has 12x magnification, 25mm objective lens and wide field of v…
- 【ADJUSTABLE EYE CUPS FIT EYEGLASS WEARERS OR NOT】The binocs can be pull down the rubber eyepieces and more fit the glasses wearer,…
- 【FMC BROADBAND COATING TECHNOLOGY】The lightweight cruise binoculars is cover with BAK4 prism texture. The objective lens use optic…
One piece of gear that makes a real difference on these trails is a compact binocular that doesn’t weigh you down. The Occer 12×25 Compact Binoculars give you 12x magnification in a body small enough to keep around your neck for hours. The adjustable eyecups work well if you wear glasses, and the FMC broadband coating keeps the image bright even in shaded forest understory. It’s not a replacement for a full-size optic, but for trail walking it’s a smart trade-off.

What Makes a Birding Trail Expert-Led?
An expert-led trail isn’t just a route with a sign at the trailhead. It’s a path designed around bird behavior — where species nest, feed, and migrate through. These trails often come from local Audubon chapters, bird observatories, or seasoned guides who’ve spent years monitoring specific patches. They know that a particular thicket holds a wintering Hermit Thrush, or that the second pond on the left draws migrating shorebirds in late April.
Look for three things when evaluating a trail:
- Habitat diversity — The best trails pass through multiple ecosystems: wetland edge, mature forest, scrubland, and open water. Each habitat hosts different species, so you’re not stuck seeing the same five birds all morning.
- Seasonal notes — Expert trails often have posted information or online guides that tell you what to expect each month. A trail that’s dead in July might be spectacular in October.
- Local knowledge integration — The trail either has interpretive signs with specific bird species or is referenced in local birding reports. If no one talks about it, it’s probably not a hotspot.
One of my favorite examples is the seasonal birding trails that follow the Pacific Flyway. These routes change with the seasons — you might walk the same path in March and see thousands of ducks, then return in June and find only a few resident pairs. An expert-led approach tells you when to go, not just where.
How to Scout a Trail Before You Walk It
Spend 20 minutes on eBird before you leave the house. Look at recent checklists from the trail area. If you see a rare bird reported yesterday, you know where to focus. If the trail has been quiet for a week, adjust your expectations — birds move on.
Next, check the trail’s length and elevation change. A 2-mile flat loop is very different from a 2-mile trail with 400 feet of elevation gain. You don’t want to be gasping for breath while a Black-throated Blue Warbler sings ten feet away. Bring water and wear boots with good traction — trails that look dry on a map can be muddy after rain.
Finally, call ahead if the trail is managed by a nature center or refuge. Ask about recent sightings and any trail closures. This is a pro move that most casual birders skip. You’ll get insider information that no app can provide.
Timing Your Visit for Maximum Bird Activity
Birds are most active during the first three hours after sunrise and the last two hours before sunset. That’s when they’re feeding and singing. Midday is for roosting — you’ll see far fewer species, and the ones you do see will be harder to spot.
Seasonal timing matters just as much. Spring migration peaks vary by latitude, but in most of North America, mid-May is prime for warblers. Fall migration is longer — August through October — but the birds are quieter and often in juvenile plumage. Winter is excellent for waterfowl and raptors, but you’ll need to bundle up and move slower.
Check the weather forecast, too. A cold front that passes overnight often grounds migrating birds — the morning after is a great time to bird. Conversely, heavy rain or high winds keep birds hidden. Aim for a calm, overcast morning with light drizzle if you can get it.
Gear That Makes a Difference on the Trail
You don’t need a $2,000 scope to enjoy expert-led trails, but you do need binoculars that focus close and handle low light. The best binoculars for birding have close focus under 10 feet and objective lenses at least 32mm. That said, compact models like the Occer 12×25 mentioned earlier are fine for open habitats where birds are farther away — just know that they won’t perform as well in dense shade.
Here’s a quick comparison of common optics for trail birding:
| Optic Type | Magnification | Best For | Trade-Off |
|---|---|---|---|
| Compact binoculars (8×25 to 10×25) | 8x–10x | Daytime, open areas, travel | Small objective lens = dim in low light |
| Mid-size binoculars (8×32 to 10×42) | 8x–10x | Most birding, good balance of brightness and weight | Heavier than compacts, but not by much |
| Full-size binoculars (10×50) | 10x | Low light, early morning, dense forest | Heavy, can cause arm fatigue on long walks |
| Spotting scope (20x–60x) | 20x–60x | Waterfowl, shorebirds, distant raptors | Needs tripod, not for handheld use |
For most people, an 8×32 or 8×42 is the sweet spot. It’s bright enough for dawn and dusk, focuses close enough for warblers, and weighs under two pounds. If you’re birding in a desert or grassland where birds are often far, a 10×42 gives extra reach. Just remember that higher magnification means a narrower field of view — you’ll find birds faster with 8x.
Also pack a field guide or a birding app on your phone. Merlin Bird ID is free and works offline, which is handy on remote trails. I still carry a paper guide for backup — batteries die, and a laminated page doesn’t need charging.
Reading the Trail: Habitat Cues That Lead to Birds
Once you’re on the trail, slow down. Walk ten steps, stop, listen for 30 seconds. Birds move away from fast walkers, so a slow pace lets you see more. Focus on edges — where forest meets field, or water meets reeds. These transition zones have the highest bird diversity because they offer multiple food sources.
Watch for movement at mid-canopy level. Many songbirds feed in the lower branches of trees, not just at the top. A flicker of motion could be a chickadee, a warbler, or a vireo. Use your binoculars to check every moving leaf — sometimes the bird is just behind it.
Listen for alarm calls. When a hawk flies over, smaller birds scold loudly. If you hear a burst of chickadee calls, look up — there may be a raptor or an owl nearby. This trick works on any trail, but it’s especially useful on expert-led routes where you’re covering more ground.
Common Mistakes Even Experienced Birders Make
One mistake is rushing to the first good spot and staying too long. The best birds are often a mile in, where the crowds thin out. Another is ignoring the weather — a sudden wind shift can shut down bird activity for hours. And many birders forget to look behind them; birds often cross the trail after you’ve passed.
I also see people over-rely on playback apps. Playing a call repeatedly stresses birds and can cause them to abandon the area. Use it sparingly, if at all, and never during breeding season. The ethical choice is to let birds behave naturally — you’ll see more genuine behavior that way.
Finally, don’t skip the remote birding trails that require a bit of effort to reach. These are often the most rewarding because fewer people visit, and the birds are less wary. Just be sure to check trail conditions and bring a map — cell service is often nonexistent.
Frequently Asked Questions
What is an expert-led birding trail?
An expert-led birding trail is a route designed or documented by experienced birders who know the local species, seasonal patterns, and best viewing spots. It often includes interpretive signs, online checklists, or guided tours that teach you what to look for at each stop.
Do I need a spotting scope for birding trails?
No. A good pair of binoculars is sufficient for most trails. A spotting scope is helpful for open water or large fields where birds are far away, but it’s extra weight and setup time. Start with binoculars and add a scope only if you find yourself wishing for more reach.
What time of day is best for birding?
Early morning — from sunrise to about 9 or 10 a.m. — is the most active period. Birds sing and feed heavily after the night. Late afternoon is second best. Midday is slow, but you can still find raptors soaring on thermals.
How do I find expert-led trails near me?
Check eBird’s hotspot map, local Audubon chapter websites, and state wildlife agency pages. Many nature centers publish self-guided trail descriptions with bird lists. Ask at local birding shops — the staff usually know the best spots and will happily share.
What should I do if I get lost on a trail?
Stay calm and retrace your steps if possible. Use a GPS app on your phone if you have signal, or a paper map. Let someone know your route before you go, and carry extra water and a whistle. Most trail systems are well-marked, but it’s smart to be prepared.
What to Do Next: Turn This Into a Habit
- Pick one local trail and bird it once a month for a year — you’ll learn its seasonal rhythms better than any guide.
- Keep a simple notebook of species, dates, and weather conditions. Patterns will emerge that you can use on other trails.
- Join a local birding group for at least one group outing. You’ll pick up tips that take years to learn alone.
- Invest in a decent pair of binoculars that fit your hands and eyes — test them in a store if you can.
- Check eBird before every trip and contribute your own checklists afterward. The data helps everyone.
- Respect trail closures and bird behavior — the best trails stay open because birders follow the rules.
- Bring a friend or family member. Birding is more fun when you can share a sighting.
Expert-led birding trails turn an ordinary walk into a wildlife encounter you’ll remember. The key is preparation — know the trail, time it right, and carry gear that works for you. Start with one trail this weekend, and let the birds guide you from there.